Difference between revisions of "Permeameters"
Jenny Hill (talk | contribs) |
Jenny Hill (talk | contribs) |
||
| (9 intermediate revisions by the same user not shown) | |||
| Line 1: | Line 1: | ||
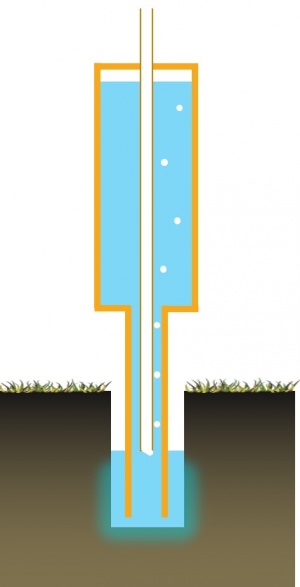
| − | [[File: | + | [[File:Mariotte Guelph.jpg|thumb|The water level within the well is determined by the height of the air tube within the permeameter, only when bubbles pass can the water drop from the reservoir above.]] |
{{TOClimit|2}} | {{TOClimit|2}} | ||
==Principle== | ==Principle== | ||
A variety of field permeameters have been developed locally, and are readily available to purchase or to hire. | A variety of field permeameters have been developed locally, and are readily available to purchase or to hire. | ||
| + | They speed up analysis (somewhat) and add some degree of accuracy to a simple [[percolation test]] by employing the [https://en.wikipedia.org/wiki/Mariotte%27s_bottle Mariotte bottle] principle to maintain a steady water level (fixed head condition) within the test well. | ||
| + | |||
They have relative benefits and limitations in their use, and as they are proprietary devices, they each have manufacturers specific recommendations for their use. | They have relative benefits and limitations in their use, and as they are proprietary devices, they each have manufacturers specific recommendations for their use. | ||
| − | Sampling strategies for their use is found on [[Design infiltration rate]] | + | Sampling strategies for their use is found on [[Design infiltration rate]]. |
| − | == | + | ==Using a permeameter== |
| − | {{float right|{{#widget:YouTube|id= | + | {{float right|{{#widget:YouTube|id=ugfUg4TeagU}}}} |
===Packing list=== | ===Packing list=== | ||
*Permeameter | *Permeameter | ||
| Line 46: | Line 48: | ||
Find a clear flat piece of ground (or a picnic table) and assemble all of the parts horizontally to reduce strain on the connectors. | Find a clear flat piece of ground (or a picnic table) and assemble all of the parts horizontally to reduce strain on the connectors. | ||
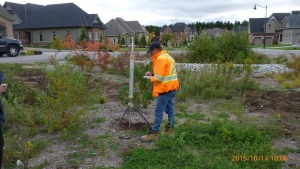
| − | + | [[File:Infiltration_Testing_1.jpeg|thumb|Infiltration testing with a Guelph Permeameter at a site in Glen Williams, Ontario]] | |
| − | |||
| − | |||
| − | |||
| − | |||
| − | |||
| − | |||
| − | |||
| − | |||
| − | |||
| − | |||
| − | |||
| − | |||
| − | |||
| − | |||
| − | |||
| − | |||
| − | |||
| − | |||
==External links== | ==External links== | ||
Revision as of 13:41, 25 July 2019
Principle
A variety of field permeameters have been developed locally, and are readily available to purchase or to hire. They speed up analysis (somewhat) and add some degree of accuracy to a simple percolation test by employing the Mariotte bottle principle to maintain a steady water level (fixed head condition) within the test well.
They have relative benefits and limitations in their use, and as they are proprietary devices, they each have manufacturers specific recommendations for their use. Sampling strategies for their use is found on Design infiltration rate.
Using a permeameter
Packing list
- Permeameter
- Auger kit
- Water container (will water need transporting to the test site?)
- Laptop with spreadsheet or field forms
- Onsite repair kit:
- Strong adhesive tape
- Knife
- Hose clamps
- Screwdriver
- Vacuum grease
- Logistics:
- Tarpaulin to kneel/work on
- Seat?
- Sunscreen and/or umbrella?
Permeameter assembly (Guelph permeameter)
There are three thin inner tubes (shown in dark red):
- the central tube is the longest and sits within the reservoir assembly,
- the bottommost tube has a washer/seal apparatus on the end which does not attach to the central tube,
- the top tube is the shortest and has an open end where it does not attach to the central tube.
The reservoir assembly comprises two tubes of the same length:
- the outer (shown in green) is unmarked,
- and there is a mid-sized tube with graduations in millimeters,
There are two further mid-sized tubes (in orange):
- the longer of these has a cup-shaped, filter-like ‘foot’ and should have a funnel shaped bushing threaded on (shown semi-transparent); this tube goes onto the base of the reservoir,
- the shorter tube has graduations in millimeters and no other components attached; it slides onto the very top around the shortest thin tube.
At the top of the reservoir section there are three small but important components to note:
- a short flexible hose to regulate air going into the reservoir; this should have a plastic ring associated to close it off,
- a hole with a rubber plug; this is used to fill the reservoir with water (not shown),
- a moveable ‘indicator’ on the inner tube; it is a small cylinder of plastic threaded onto the tube which come directly from the reservoir.
The order in which the parts are assembled will be dictated by which connectors can fit through which holes within the connecting plates. It is easiest to connect up the thinnest tubes first. Find a clear flat piece of ground (or a picnic table) and assemble all of the parts horizontally to reduce strain on the connectors.
External links
In our effort to make this guide as functional as possible, we have decided to include proprietary systems and links to manufacturers websites.
Inclusion of such links does not constitute endorsement by the Sustainable Technologies Evaluation Program.
Lists are ordered alphabetically; link updates are welcomed using the form below.


