Difference between revisions of "Finishing grades and surface layer installation: vegetated LIDs"
| Line 53: | Line 53: | ||
==Mulch placement== | ==Mulch placement== | ||
| − | Wood mulch provides numerous functions to a bioretention practice including reducing soil erosion, filtration, protecting underlying soils from compaction, retaining moisture, and minimizing volunteer weed establishment. Communicate to contractor how to install and the mulch type in the plans and or specifications with notes, details, spot elevations, and other special features needed as per designed. | + | Wood [[mulch]] provides numerous functions to a bioretention practice including reducing soil erosion, filtration, protecting underlying soils from compaction, retaining moisture, and minimizing volunteer weed establishment. Communicate to contractor how to install and the mulch type in the plans and or specifications with notes, details, spot elevations, and other special features needed as per designed. |
Equipment recommended for this task can be: | Equipment recommended for this task can be: | ||
Revision as of 19:32, 17 October 2022

The construction guidance in this section applies to all sub-surface and ground-level LID practices with a vegetated surface layer. By definition this includes bioswales, rain gardens, bioretention gardens, and enhanced swales. Depending on the design, the surface layer of exfiltration trenches and infiltration chambers, trenches, and soakaways may also be vegetated.
For guidance on LID practices with permeable pavement surfaces, see the finishing grades and surface layer installation: permeable pavements page.
Overview[edit]
This section gives guidance for project managers, engineers, and contractors on the excavation and grading steps required for successful construction of sub-surface and ground-level LID practices.
Soil media and amendments[edit]
Bioretention can be constructed over any soil type, but hydrologic soil group A and B are best for achieving water balance objectives. Facilities designed to infiltrate water should be located on portions of the site with the highest infiltration rates. STEP has detailed construction guidance on soil amendments available on its Construction Specifications for Implementing Compost Amended Planting Soil in Ontario[1]. These resources include specification details and a spreadsheet calculator for determining soil and amendment volumes.
Construction Steps:
- Apply soil media in 150-300 mm lifts until desired top elevation of bioretention, bioswale or rain garden area is achieved.
- Apply soil media with slinger trucks when possible. This type of equipment will reduce the need to move soil media manually or by backhoe.
- Thoroughly wet each lift before adding the next and wait until water has drained through the soil before adding the next lift.
- If amending soils:
- Stockpile native soils in designated areas.
- Mix selected additives with native soils using appropriate equipment.
- Sling soils into the LID feature whenever possible.
Key Inspection Points:
- When material arrives to the site: perform chain of custody, visual inspection and ribbon test to ensure that material meets design requirements.
- Soil/filter media’s design parameters and assumptions should be confirmed through in-situ permeability testing (e.g., permeameter measurements to determine hydraulic conductivity). Results of permeability testing should be reviewed by the designer and, if required, changes to the LID design may be needed. See Testing for more information regarding testing procedures.
- Ensure that soil media is being applied to the correct depth.
- Ensure that the native soil and amended material are well blended.
- Measure potentially compacted soils using a cone penetration test or a cone penetrometer.
Mistakes to Avoid:
- Machine compaction: Equipment should not be operated within the infiltration practice.
- Soil material: Accepting material that does not meet design specifications and requirements.
- Application: Applying the next lift without letting dry the previous lift of filter material.
Finish grading[edit]
The finish grading process is another critical handoff moment as a number of elements such as curbs, sidewalks, soils and vegetation start to come together to create the functional and aesthetic value of a site. The same supervision and communication that was put into controlling ESC in earlier stages is also required during finish grading. Careful attention to detail is still needed in these final phases to ensure the success of the final product
Construction steps:
- Backfill or sling material from outside of the LID facility at the lowest possible speed to avoid loss of component material.
- Apply material in 150-300 mm lifts until the desired elevation and thickness, allowing for positive flow.
- Wet material between lifts, allowing for drying before backfilling/slinging another lift.
Large stone and riprap[edit]
Construction: large stone and riprap
Plant material verification and installation[edit]
Construction: plant material verification and installation
Mulch placement[edit]
Wood mulch provides numerous functions to a bioretention practice including reducing soil erosion, filtration, protecting underlying soils from compaction, retaining moisture, and minimizing volunteer weed establishment. Communicate to contractor how to install and the mulch type in the plans and or specifications with notes, details, spot elevations, and other special features needed as per designed.
Equipment recommended for this task can be:
- Automated: Mulch blowers.
- Manual: Shovels, buckets, level rakes.
During installation:
- Ensure that mulch depth should be no greater than 75 mm to maintain oxygen supply to underlying soils.
- Ensure that the top of the mulch meets the finish elevation as per design.
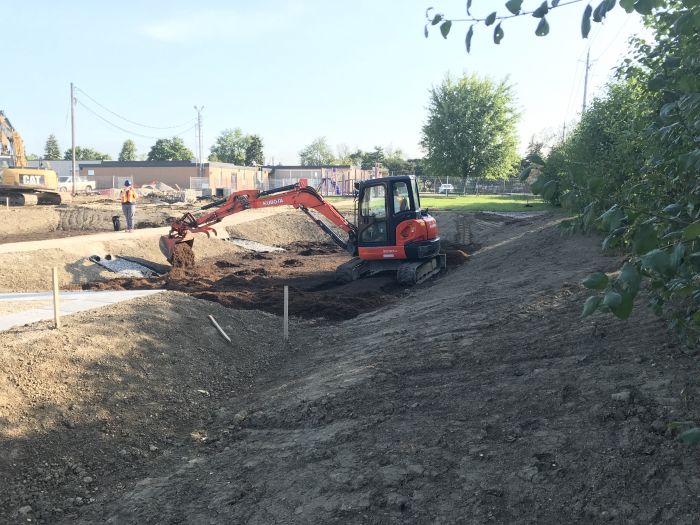
Machinery placing mulch in a rain garden at Glendale Public School in Brampton, ON. Read about the Design and Build Overview in this case study.
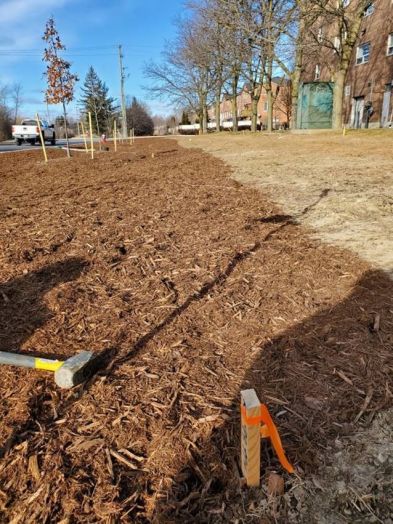
Mulch layer as the final grade in the Haggert Ave bioswale project in Brampton, ON.
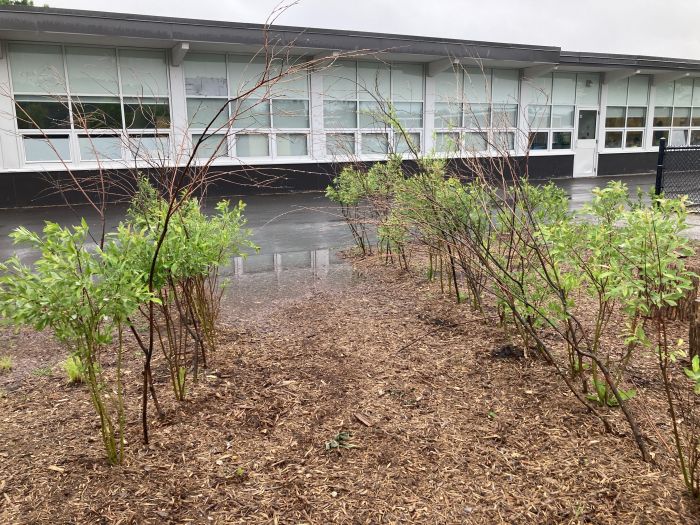
Elevation problem with the mulch close to the end of this rain garden at Mineola P.S. This elevation is not allowing runoff to fully enter the rain garden and causing ponding in this low spot.


Stabilizing contributing drainage area - planting adjacent vegetation[edit]

Similar to the plant material verification and installation task shown above, any planting required to stabilize the contributing drainage area will need to meet the specifications and considerations shown above.
Additionally, if turf/grass is required to stabilize the contributing drainage area, installation should be done as per the grower/nursery’s specifications and standards.
As-built surveys[edit]
Throughout the construction process, it is sometimes necessary to deviate from the intended design of LID features and adapt the design to on-site conditions. The completion of a post-construction as-built survey is a standard operating procedure for engineering projects that captures any changes made to the feature’s design during construction. For an example of municipal standards for as-built surveys, refer to the City of Toronto's Engineering Survey Standards for Consultants[2]
Survey Steps:
- Use the same datum as the pre-engineering survey.
- If a pre-engineering survey is not available, use a reference feature as the datum.
- Identify the type, diameter, and material of exposed utilities.
- Include data on critical feature elevations and existing utilities, such as:
- Inverts of newly installed pipe
- Vertical and horizontal bends in pipes
- Existing public utilities
- Existing private utilities
- New and existing structures (e.g., catchbasins, manholes, chambers, etc.)
Inspection Points:
- Datum matches the pre-engineering survey or selected reference feature.
- Data provided in as-built survey matches the as-built standards of the local municipality.
Permanent fencing[edit]

Delineating features with permanent fencing can eliminate tripping and falling hazards and protect soil media and plantings.
Construction Steps:
- Securely install fencing around the perimeter of the feature.
Inspection Points:
- Fencing size and material matches design.
- Fencing is installed in correct location as per design.
References[edit]
- ↑ STEP. 2019. Construction Specifications for Implementing Compost Amended Planting Soil in Ontario: https://sustainabletechnologies.ca/home/urban-runoff-green-infrastructure/healthy-soils/construction-specifications-for-implementing-compost-amended-planting-soil-in-ontario/
- ↑ City of Toronto. 2021. Engineering Survey Standards for Consultants. https://www.toronto.ca/wp-content/uploads/2017/11/98c7-ecs-specs-surveys-engsrv_survey_standards_for_consultant.pdf